
If you’ve ever found yourself holding a design you love — maybe it’s your business logo, a drawing, or a digital piece of art — and wondered, “How can I turn this into embroidery?”, you’re not alone. Whether you’re a DIY enthusiast or running a small embroidery business, converting an image to a PES file format is the essential first step for embroidery success, especially if you’re using Brother or Babylock machines.
The PES format is widely used in home and professional embroidery circles. It’s the language your embroidery machine speaks, telling it how, where, and in what order to stitch every part of your design. But going from a standard image file like JPG or PNG to a PES file isn’t as simple as dragging and dropping. It requires a process called embroidery digitizing — and that’s where things get both exciting and technical.
Let’s walk through what PES files are, how to convert image to PES for embroidery, and what tools or services you’ll need along the way. Whether you’re a beginner or looking to improve your embroidery workflow, this guide will help you stitch smarter.
First, let’s break down what a PES file actually is. PES stands for “PhC Embroidery Stitch” file — a proprietary format used by Brother and Babylock embroidery machines. This file contains specific instructions for your machine: stitch types, color changes, sequencing, and coordinates. It’s not just a picture of your design; it’s a detailed plan that guides your embroidery machine step by step.
You can’t just save a JPEG or PNG as a PES file using basic image editors like Photoshop or Canva. To create a usable PES file, you need embroidery digitizing software that’s built for converting and managing stitch data. The process takes your visual image and translates it into thread paths — not pixels — that an embroidery machine can execute.
So how do you actually convert an image to PES format? There are two main routes: you can do it yourself with embroidery software, or you can hire a professional digitizing service.
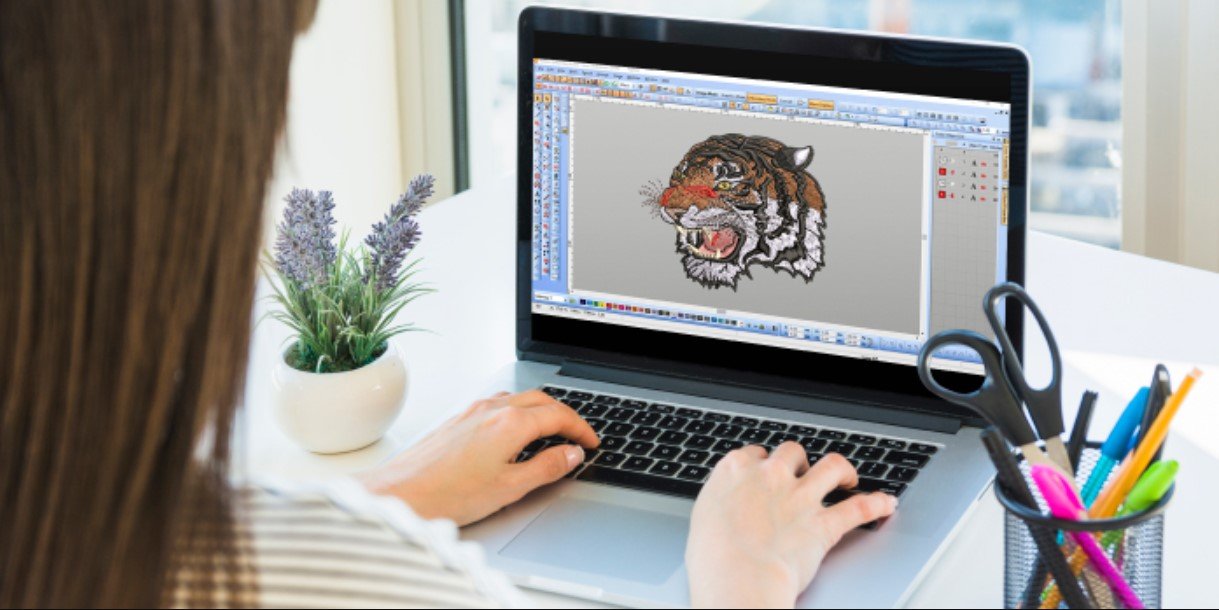
Option 1: Convert the Image to PES Yourself
If you’re hands-on and ready to learn, DIY digitizing is a rewarding option. You’ll need digitizing software — not just any graphics editor, but programs specifically made for embroidery.
Popular software choices include:
- Hatch Embroidery Software – Great for beginners and professionals.
- Brother PE-Design – Perfect for Brother machine users.
- Embird – A budget-friendly option with lots of features.
- SewArt – Good entry-level software for hobbyists.
- Wilcom – An industry-standard tool, more advanced but very powerful.
Here’s how the process works in a nutshell:
- Import Your Image: Start with a clean, high-resolution image. Simple designs with bold lines and minimal colors are easier to digitize.
- Trace or Outline the Design: Depending on your software, you may be able to auto-digitize the image, or you’ll need to manually trace the parts you want to embroider.
- Assign Stitch Types: Here’s where the magic happens. You decide which areas get satin stitches, fill stitches, or run stitches. You’ll also assign directions, densities, and underlay settings to prepare your image for stitching.
- Adjust Colors and Sequencing: Match your threads and arrange the stitching order so your machine runs efficiently. Color sorting reduces thread changes and saves time.
- Set the Fabric Type: Choose settings based on whether you’re stitching on cotton, fleece, canvas, or stretch materials. The fabric affects tension, pull compensation, and stabilizer needs.
- Preview and Test: Before saving your PES file, most programs let you preview how it will look when stitched. Always test on sample fabric to make final tweaks.
- Export to PES: Once everything’s set, export the design in PES format. Transfer it to your embroidery machine using a USB, memory card, or direct software connection.
This DIY approach is great if you plan on doing frequent custom embroidery or want total control over your designs. However, it does have a learning curve. Stitch logic, density, and sequencing matter — and one wrong setting could result in poor embroidery quality or broken needles.
Option 2: Hire a Professional Digitizing Service
If digitizing sounds overwhelming or you need the design fast, there’s another option: leave it to the pros. Professional embroidery digitizing services specialize in turning images into perfect stitch files, including PES format, and they understand all the nuances that go into clean, efficient design files.
You simply send them your artwork (JPG, PNG, PDF, or vector), tell them what size and fabric you’re working with, and they’ll handle the rest.
Here are three trusted digitizing services that convert images to PES files with speed and precision:
1. Digitizing Buddy
Well-known for their fast turnaround and high stitch quality, Digitizing Buddy delivers clean, ready-to-stitch PES files for logos, monograms, and full-color designs. Their customer service is friendly and they handle revisions quickly. Whether you’re embroidering hats, jackets, or tote bags, they make it easy and affordable.
2. Absolute Digitizing
With years of experience and a reputation for consistent work, Absolute Digitizing handles everything from basic logos to complex, multi-layered embroidery projects. They’re great at accommodating fabric type, design style, and machine requirements. If you want professional-grade PES files, they’re a safe bet.
3. Cool Embroidery Designs
Perfect for both custom orders and pre-made patterns, Cool Embroidery Designs is a favorite for hobbyists and creatives. If you want a fun, ready-to-use design or need custom digitizing with a modern touch, they offer a wide selection and skilled conversion to PES format.
Professional digitizing usually costs between $10 and $25 per design, depending on the complexity. It’s a small investment to avoid headaches and wasted materials. Plus, once your design is digitized, you can reuse it as many times as you like — a big win for small businesses and busy crafters.
Key Tips for Getting the Best PES File
No matter how you convert your image, here are a few expert tips to get better results:
- Start simple: Clean logos or illustrations work best. Avoid images with too many small details or gradients.
- Use high-resolution files: The higher the quality, the easier it is to trace and digitize.
- Stick to a limited color palette: Fewer thread colors mean a smoother stitching process.
- Know your fabric: Let your digitizer or software settings reflect whether you’re stitching on stretch, thick, or delicate fabric.
- Test before mass production: Even a perfectly digitized file might need a tweak based on thread weight or fabric tension.
Final Thoughts
Turning an image into a PES embroidery file doesn’t have to be complicated. With the right tools, software, or professional service, you can bring your designs to life in thread — one clean stitch at a time.
Whether you’re creating branded apparel, personalized gifts, or artistic embroidery pieces, the PES file is your ticket to precision stitching. You can choose to digitize it yourself and learn the ropes or outsource it to reliable pros like Digitizing Buddy, Absolute Digitizing, or Cool Embroidery Designs. Either way, converting an image to PES format is the key to unlocking a whole new level of embroidery creativity.
So next time you spot an inspiring image or logo, don’t just admire it — stitch it. The thread is waiting.
Let me know if you’d like a shorter version for a blog post preview, meta description, or a downloadable guide!